Follow Me On Social Media!
Irresistible Boston Cream Pie Cheesecake
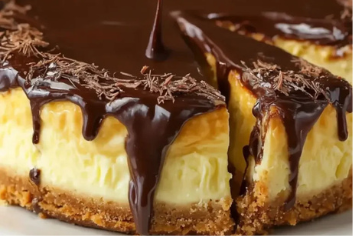
Some desserts just hit the sweet spot between nostalgia and indulgence — this one certainly does. The Boston Cream Pie Cheesecake fuses the familiar flavors of a Boston cream pie with the smooth richness of cheesecake. Whether you’re entertaining guests or indulging in a well-deserved treat, this dessert is a delightful choice. One bite and you’ll see why it’s worth adding to your baking repertoire.
Why You’ll Love It
This cheesecake is a dessert lover’s dream. It brings together two favorites — the creamy texture of cheesecake and the beloved taste of Boston cream pie — into one impressive yet approachable recipe. With relatively simple prep and a clear baking process, you can create something that looks and tastes like a special-occasion dessert without too much fuss. Your taste buds will thank you!
Ingredients You’ll Need
Here’s the list of what you’ll gather to make this treat:
- Graham cracker crumbs – for the crunchy, sweet base.
- Unsalted butter, melted – binds the crust and adds richness.
- Granulated sugar – adds sweetness both to the crust and filling.
- Cream cheese – the central component, giving the cheesecake its creamy texture.
- Eggs – for binding and structure in the filling.
- Vanilla extract – adds warmth and depth to the flavor.
- Sour cream – adds tang and helps balance sweetness.
- Heavy cream – for the whipped topping.
- Powdered sugar – sweetens and stabilizes the whipped cream.
- Chocolate chips – melted to form a decadent drizzle.
- Milk – helps smooth out the melted chocolate.
Optional: Use a crushed Oreo cookie crust instead of graham crackers if you’d like a chocolatey twist.
Step-by-Step Instructions
- Preheat your oven to 325 °F (163 °C).
- In a medium bowl, mix together the graham cracker crumbs, melted butter, and granulated sugar (2 Tbsp). Press this mixture firmly into the bottom of a 9-inch springform pan to form the crust.
- In a large mixing bowl, beat the softened cream cheese with 1 cup of granulated sugar until smooth. Add the eggs one at a time, mixing well after each addition. Then stir in the vanilla extract and sour cream until fully incorporated.
- Pour the filling over the prepared crust in the springform pan. Bake for 55–60 minutes, or until the center is set yet still has a slight jiggle — this ensures perfect texture once chilled.
- After baking, turn the oven off and leave the cheesecake inside for 1 hour to cool gradually; this helps prevent cracking. Then remove it, allow it to reach room temperature, and refrigerate for at least 4 hours or preferably overnight.
- For the chocolate drizzle: In a small saucepan set to low heat, combine the chocolate chips and milk. Stir until the chocolate is melted and smooth. Let it cool slightly before using.
- For the whipped topping: In a mixing bowl, whip the heavy cream with the powdered sugar until soft peaks form. Spread this over the top of the chilled cheesecake.
- Finish by drizzling the cooled chocolate over the whipped cream. Slice and serve — each bite delivers that creamy cheesecake texture, sweet chocolate drizzle, and the satisfying base.
Tips for Success
- Make sure the cream cheese is at room temperature — it mixes more smoothly.
- Don’t skip the “cool in oven” step, as it helps avoid cracks in the cheesecake.
- If you prefer an ultra-creamy texture, bake the cheesecake in a water bath.
- Chilling overnight gives the best flavor and texture.
- For variation, top with fresh berries or caramel, or swap in different crusts or toppings.
Equipment You’ll Need
- A 9-inch springform pan (makes removal easier; a regular cake pan may work, but serving could be trickier).
- Mixing bowls — one medium for the crust, one large for the filling.
- An electric mixer (hand or stand) to ensure a smooth filling.
- A spatula for smoothing the whipped cream topping.
- A small saucepan to melt the chocolate and milk for your drizzle.
Variations to Try
- Oreo Crust: Swap crushed Oreo cookies for the graham cracker crumbs for extra chocolate flavor.
- Gluten-Free Option: Use gluten-free graham cracker crumbs or almond flour for the crust.
- Fruit Topping: Add fresh strawberries or raspberries on top of the whipped cream for color and brightness.
- Chocolate Ganache: Instead of a simple drizzle, use heavy cream + chocolate to make a richer ganache.
- Vegan Version: Use vegan cream cheese and coconut cream for the whipped topping to make it dairy-free.
Serving Suggestions
- Serve with a scoop of vanilla ice cream for a classic touch.
- Pair with fresh berries for a vibrant contrast.
- Drizzle caramel sauce for an extra sweet layer.
- Enjoy with a cup of coffee or espresso to balance the richness.
- Garnish with chocolate shavings for a polished presentation.
FAQs
- Can I make this dessert ahead of time? Yes — in fact, it’s better chilled overnight. Just cover it well in the refrigerator.
- How should I store leftovers? Keep any remaining cheesecake in an airtight container in the fridge; it should stay good for up to five days.
- Can I freeze it? Absolutely. Wrap individual slices tightly in plastic wrap and place in a freezer-safe container; it can keep for up to three months.
- What if I don’t want to use cream cheese? You can use Neufchâtel cheese for a lighter option or a vegan cream cheese substitute for a dairy-free version.
- How do I get a thicker chocolate drizzle? Use more chocolate chips in the mixture, or let the melted chocolate cool a little longer before drizzling.
Final Thoughts
Baking this Boston Cream Pie Cheesecake is more than simply following a recipe — it’s about creating memories. With each slice, you’re sharing indulgence, nostalgia, and joy. The creamy layers, rich chocolate drizzle, and airy whipped topping combine into a dessert that elevates any moment, whether it’s a family gathering or a quiet evening in. So roll up your sleeves, embrace the process, and savor every sweet reward. Every bite is a reminder why you love baking and sharing delicious treats.